 Paul Royer
Legacy Application Modernization: Key Steps, Benefits & Best Practices
This blog post was co-authored with Riaz Merchant, President and CEO at Mertech. In the fast-paced software world, 'legacy' often signals a warning.


Migrate and run DataFlex applications with Oracle, MS SQL Server, PostgreSQL, MySQL & MariaDB.
Stuck in Crystal XI? Upgrade and use the latest versions of Crystal Reports with DataFlex applications.
Convert from Btrieve / P.SQL / Actian transactional engines to Oracle, MS SQL Server, and PostgreSQL

Quickly build multi-protocol web services with the same API. Supports JSON-RPC, REST, SOAP, Thrift, and gRPC.


Thriftly was developed with one goal in mind: allow a business to transform their existing Java codebase into a powerful API platform with minimal changes to their code and expose it to the world with the click of a button.
Well, not only has this goal been achieved, but it has been far surpassed with the addition of many exciting tools and features. By writing simple Java functions and publishing them with Thriftly you will have the ability to do the following:
To show just how easy it is, let's build a Java Web API with Thriftly that does some basic string manipulation.
[ Click here for a video version of this guide ]
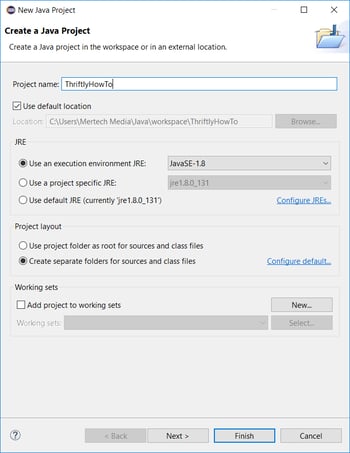
• Follow Installing and Licensing Thriftly Developer [Guide] to create an account, install the desktop application and register your new installation.
NOTE: A robust Java Thriftly example application is included with your Thriftly installation at C:\Users\{USER}\Documents\Thriftly Developer\Java.
For this tutorial we have chosen to use the Eclipse IDE, however if you are using an IDE other than Eclipse (such as IntelliJ or NetBeans) it should be fairly easy to adapt these instructions for your platform, with some minor tweaks. If at any point you need additional assistance, create a topic in our Developer Forum and someone from the Thriftly team will gladly assist you.
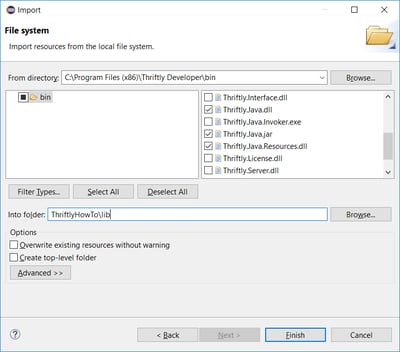
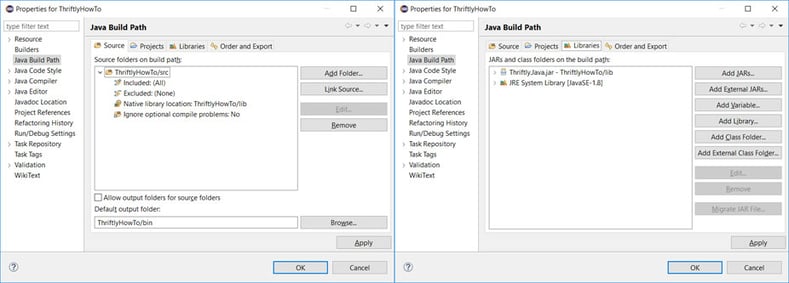
Now that we have our environment set up and we are referencing the needed Thriftly libraries, we can begin building our API.
In the following code sample, you will see a basic skeleton to initialize a Thriftly Server and add services. The StringService() object is where our API logic lives, and we are adding that class to be published by Thriftly. Later you will see how Thriftly can publish the API privately or publicly.
import thriftly.java.ThriftlyServer;
import thriftly.java.EvoException;
public class Main {
        public static void main(String[] args) throws EvoException {
                ThriftlyServer thriftlyServer = new ThriftlyServer();
                thriftlyServer.AddService(new StringService(), "StringService");
                thriftlyServer.StartServer();
        }
}
import thriftly.java.PublishedAttribute;
import thriftly.java.ParametersName;
public class StringService {
        @PublishedAttribute()
        @ParametersName(Names = { "string1", "string2" })
        public String Join(String string1, String string2) throws Exception{
                if(string1.compareTo("") == 0){
                        throw new Exception("string1 must be defined");
                }
                if(string2.compareTo("") == 0){
                        throw new Exception("string2 must be defined");
                }
                return string1 + " " + string2;
        }
        @PublishedAttribute()
        @ParametersName(Names = { "string1" })
        public String ToUpper(String string1) throws Exception{
                if(string1.compareTo("") == 0){
                        throw new Exception("string1 must be defined");
                }
                return string1.toUpperCase();
        }
}
At this point, we have a very primitive string API service that has two published functions. We can start the Thriftly Service by clicking the Start button or by pressing F5.
The Thriftly Developer window will appear once your service has started. Here you can choose the transport method, the default protocol, and encoding that meet your needs. You can change any of the settings by stopping Thriftly.
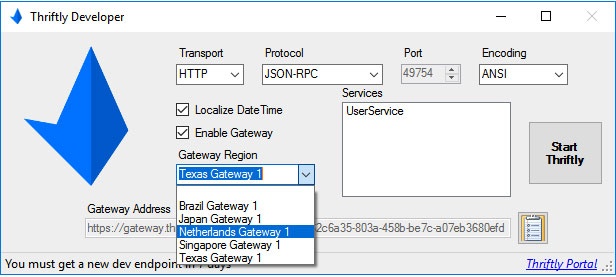
To expose our API to the world and take full advantage of Thriftly's documentation and testing features we will start with the gateway enabled. If you start Thriftly without a Gateway enabled, the Thriftly API will only be accessible through your chosen port on your localhost. After clicking the Enable Gateway option, select the region closest to your location to ensure the best possible performance.
When you click the Start Thriftly button, your default web browser will automatically appear with the Gateway Address loaded. The Gateway Address will point to a static page containing the specifications and documentation for the API we just created. This address can be shared with your developer(s) so they can start testing calls and building clients to consume your API.
To begin testing our API, click the Test API link in the StringService box. This will take you to a custom APEye interface that provides a simple GUI for testing your published API functions. Since we started the Thriftly Developer in JSON-RPC, the APEye interface will automatically load a request and response interface through JSON-RPC.
.jpg?width=711&name=thriftly-API-testing-interface-developed-by-mertech%20(1).jpg)
To begin accessing the API from an external client, copy the Location URL in the StringService box and direct all of your client calls to that address. Calls to this address are routed directly to the API running locally on your machine through Thriftly's secure proxy. You now have access to your local data from anywhere in the world. No network configuration or code changes required!
For additional information and examples please visit Testing Your Thriftly API [guide].
In less than 30 minutes we have just defined and exposed a multi-protocol API live to the internet using 100% native Java code. No need to learn a new language, no need to migrate all of your data, no need to spend hours trying to reconfigure your network. Just define your functions, hit start, and then let Thriftly publish your data through a secure, encrypted gateway proxy.
When you are happy with the way your API is running, the next step is to deploy the API to production by setting up the full Thriftly Deployment Server on a dedicated machine.
Helpful Links:
Installing and Licensing Thriftly Developer [Docs]
Java Developers API Guide [Docs]
Installing and Licensing Thriftly Deployment [Docs]

This blog post was co-authored with Riaz Merchant, President and CEO at Mertech. In the fast-paced software world, 'legacy' often signals a warning.

This post was co-authored with Riaz Merchant, President/CEO at Mertech Data Systems, Inc.

Shifting from your traditional legacy systems to the Cloud can be a game changer, as the benefits of cloud migration are numerous. Cloud computing...